Overview:
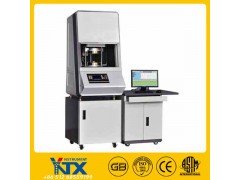
The CRS-VTM200 Rotorless instrument is Our recently launched another high-tech electromechanical integration products. Mainly by the host, temperature measurement, temperature control, sensors, large-screen LCD display, new microcontrollers, printer and electrical chain and other components. Temperature measurement and control circuits by adaptive high-precision PID temperature controller, the state of the relay, platinum resistance heaters, automatic tracking of the outer grid and ambient temperature changes, automatic and immediate correction PID parameters to achieve fast, accurate control temperature purposes. Data acquisition system in strong support of the new controller and related software, measurement data quickly optimize storage data processing, in addition to real-time on the big screen liquid crystal display simultaneously watch the temperature of the upper die and lower die temperature and the torque of the three curves , further accurate measurement of the scorch time, the vulcanization time, cure rate index, minimum and maximum torque. Curve and related parameters can print on your printer, control the quality of the rubber, the rubber industry and rapid testing with and rubber basic research of the ideal equipment.
The main technical indicators:
A. High-precision sensors: 0 ~ 20N.m. Resolution: 0.001N.m.
B. Control systems: computer control and interface boards for data acquisition, preservation, processing and printing of test results and curve processing.
C. Rotation system: Stepper the Electronics governor Motor + amplitude adjustment. Swing angle: ± 0.5? ± 1?
D. Temperature control system: Inteligent digital temperature control instrumentation, instant of Automatism adjustment PID control parameters. Temperature control range of 0 - 200 ° C, the temperature control accuracy ≤ ± 0.3 ° C temperature resolution of 0.1 ° C.
E. Data transmission: RS232 transmission
F. The Display: Vulcanize-105 + WIN-XP test software computer screen display, plus excellent user software and state-of-the-art hardware makes the whole measurement becomes very convenient, fast, accurate and pleasant.
G. Cavity: Cr6wv material, meet the the GB/T16584-1996 standard requirements.
F. Way of monitoring and control: measurement and control humanized mouse that point that panel touch of a button or host two pilot basis
Software Features:
A. The test standardization: in line with GB/T16584 "rubber - the Rotorless measured characteristics vulcanization", ISO6502: 1991 and ASTMD5289-95.
B. The test product: set the number of the rubber name, such as "tire on the 5th," RBS6, "and so on. For users plus drawings of the print title name, the title can be set to any form of text description.
C. Special note: high-quality features and user-friendly design, excellent function can be modified during the test measurement time, rubber estimate 20 minutes vulcanization is complete, set the measurement time of 20 minutes, in fact, do 11 minutes and found 9 points, 10 points at already vulcanized completed this time has no need to do further down, simply "modify measurement time under 20 is divided into 9 or 10, click" Submit ", the experiment immediately stop the 9 or 10 on draw complete vulcanization curve , calculated all the information. If experiments done 18 to 19 minutes to be the end of the the vulcanization curve is still upwards, vulcanized not yet completed, the experiment must be further down, or information derived from wrong. Then can modify the measurement time of 25 minutes or more, let the experiment continue until the vulcanization is complete. This feature is undoubtedly greatly facilitate the users, saving valuable time and rubber.
D. Graph is scale automatically optimize Auto Scale, the measurement is completed, the software will be based on the measurement of the magnitude of 0-5 Mv0-10Mv 0-20Mv automatically adjust the Y scale to make the curve more beautiful, multi-curve comparison completely different rubber The different shape of the curve, a different measurement time, also compared.
E. Database: Software preset 100 number database. Each library can be stored in the infinite set of measurement data. The purpose of this is the face of a few months, years, decades thousands of group information in the future convenient query, the user can be placed in different time periods in different databases, set the database bit yuan address .
F. The end of the test the automatic archiving, test is completed automatically calculate t10, t30, t50, t70, t90, ts1, ts2, Vc1, Vc2, maximum torque, minimum torque and so on.
Main technical specifications:
Temperature range: 100 ~ 200 ℃
Heating time: ≤ 10 min
Motif temperature fluctuation: ≤ ± 0.2 ℃
4. The torques Range: 0 to 20 N.m
Swing frequency: 1.7 Hz (100 r.min-1)
6 swing amplitude: ± 0.5 ° ± 1 °
7 cavity structure: Monsanto forms
8. Report: ML, MH, TS1, TS2, T10, T30, T50, T70, T90, the vulcanization curve, the temperature curve
Executive standard: ASTMD5289-95 ISO6502: 1991 GB/T16584-1996
10 Supply Voltage: AC 220V ± 10% of
11. Dimensions: (long ╳ wide ╳ high) 680mm ╳ 650 mm ╳ 1100 mm
Net weight 350Kg
Main configuration:
1, the real high-precision closed die cavity structure with the United States Alpha synchronization.
2, the U.S. high-precision sensors, the accuracy of 0.001N.M
3, Japan NSK high-precision bearings.
4, Germany the SDPC Group high-performance cylinder.
5, the Sino-foreign joint Yade polite movable element.
Powerful Germany dedicated module, advanced technology, test data is synchronized with Alpha.
7 automatic door lift, security protection.
8, electronic components critical part of the military components, reliable quality and stable performance.
9 direct temperature control of the computer software, technical accuracy up to 0.01 ° C Alpha.
10, 17 inch LCD computer brand, HP color printer.
The functions of some of the high-quality of the curemeter Special note:
The 0 curemeter In addition to providing conventional vulcanization curve and temperature curve, the one associated with the curing speed curve. Adjacent two points torque increase value and the ratio of the difference of the maximum and minimum torque, which is a relative value, which reflects the vulcanization rate, while providing maximum vulcanization velocity value and time.
1 single curve measurement, multi-line continuous measurement and comparison measurement. Single curve measurements - measured of a vulcanized curve and print. Multi-line continuous measurement - any vulcanization curve and print can be measured on the same interface. Comparison test - the vulcanization curve measured previously used for standard measurements to compare with it, any vulcanization curve can be measured. Of the vulcanization curve, parameter measured screened to identify the best experimental value.
After measuring the curve data stored in the database, and restore its reproduction. Re-painting a vulcanized graphs and print. Five the vulcanization graph and print can be redrawn, and redrawn 18 vulcanized graphs and print. The vulcanization curves of different plastic materials can be painted on a chart comparison, in order to find out to find the optimum cure time. That is completely different from the plastic material of the so-called different parameters, the shape of the vulcanization curve, the measurement time is not the same, such as 3 minutes and 5 hours to measure the curve of the time, they are drawn in a diagram for the plastic material between the mutually comparable. This functionality and data retrieval function is used in conjunction with the best choice of parameters greatly enhance the accuracy and efficiency of.
3 instrument experimental test process can be modified to measure time. If a rubber completion of the estimated 20 minutes sulfide to now 10 points at sulfide has been completed, there is no need to do down, as long as the the experimental graph that displays the bottom right modify the measurement time of 20 to 10 points press "send such experiment immediately cease on 10 points, draw a complete vulcanization curve. If the experiments do 18 points, 19 minutes to be the end of the the vulcanization curve is still upwards, vulcanization is not yet completed, the experiment must be further down. Can modify the measurement time of 25 minutes or more, let the experiment continue to do, until vulcanization is completed. This feature greatly facilitates user, saving valuable time and rubber.
Four instruments to measure torque quantitative process. After the measurement is completed, the software will be based on the size of the measured values at 0-5Nm ,0-10N m, 0-20N m and then automatically scale once to make the curve more beautiful.
5 instrument of measuring square test, measurement time, range, control the temperature of the database, precision calibration, data retrieval, curve data printing simply display a simple set, move the mouse to complete. "Measurement" key to be completed by "clamping", "plus torque", "measuring" multiple actions, operating a shortcut. The man-machine interface is quite user-friendly, and a look at the screen to know how to operate. Colorful graphics, but does not irritate the eyes.
6, such as 15 minutes to do a test experiment, eight hours a day to count, at least the curve and the data can be kept for more than 15 years.


